How To Build Self-Watering Raised Garden Beds

A self-watering raised garden bed is a type of garden bed with a built-in watering system that provides a consistent water supply to the plants.
It is also a convenient planting option for gardeners who want to ensure their plants receive adequate water without regular manual watering.
This garden guarantees improved drainage & soil aeration and can fit a small-size balcony or backyard.
By building a self-watering raised garden bed in a grid pattern, you can reduce the amount of water by up to 50% while maintaining optimal soil moisture for your preferred plants.
In other words, a self-watering raised garden bed can be a valuable asset where water and other resources may be limited.
Here’s how a self-watering garden can be advantageous:
Here are the steps I took to build an economical self-watering raised garden at home.
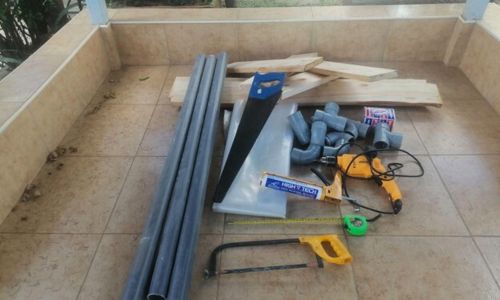
The most common materials to use will include wood, screws, 8mm black polythene paper, a hacksaw, nails, tape measure, gardening soil, compost, mulch, irrigation tubing/perforated PVC, and a piece of ¾-inch hose.
In my case, I used the readily available untreated cedar for the bed frame to increase its durability. However, you can still use pressure-treated lumber or a large food-grade plastic container cut into two halves.
Before measuring the raised garden, know your landscape, including space, number of trees, and paved surfaces. This will particularly help you determine how much material is required.
Related: How to Build an Endless Hot Water System (Without Electricity)
In my case, I used 3 feet by 5 feet long 6*1 inch longboards because I was planning to install the garden on the balcony. But you can use longer boards if you have enough space.
In this step, I used a handsaw to cut the sides of the raised garden bed frame.
A handsaw is convenient because it does not need electricity—a perfect solution in a grid-down situation.
Next, I assembled the frame by screwing the corners. I attached all the boards with screws instead of nails to make the frame firm.
But if desired, you can create a grid pattern to section off different parts of your raised garden bed for specific plants or vegetables, which is particularly useful if you are creating multiple tiers within one raised bed.
The next step would be choosing the ideal area with ample sunlight and easy access to water.
Also, you should move the project to that location because the garden can be bulky or heavy at this stage.
Afterwards, I attached the base of the bed. I preferred a used blockboard because it was firm and could carry the weight of the gardening soil, plus the PVC water reservoir.
To prevent water from leaking, I lay a sturdy polythene paper to create a water-tight seal inside the garden bed.
Note: Avoid puncturing holes in the polythene paper to prevent leakage. Instead, use tape to secure the polythene along the garden bed. Also, it is easier to begin at the sides before finishing off at the corners.
Related: How Growing Your Own Vegetables Can Get You Arrested
It would be best to use thick polythene paper (probably 8mm or heavier) to increase its durability.
Once the frame and the polythene paper are in place, add a thin layer of medium-sized gravel (without jagged edges) to fill the base to the desired level—about 6 inches high.
When filling in the bed, remember to leave enough room for the irrigation hoses and tubes.
Note: The gravel prevents the perforated 2-inch PVC irrigation pipes from blocking after adding gardening soil and dirt to the garden bed.
I used perforated 2-inch PVC drain pipes to create a simple irrigation system. But you can use other alternatives such as a corrugated/perforated hose.
Furthermore, you can use larger diameter irrigation tubes depending on your setup or if you have enough space at home.
I also included a water inlet and outlet on both corners of my setup.
I made a ¾-inch hole on one side of the bed, then attached a hose to drain the excess water from the irrigation system.
I filled the garden with the correct ratio of compost and manure to enrich the soil and provide nutrients to the plants’ roots.
But if you like, you can place a thin-layer landscape fabric between the gravel and the gardening soil to create a barrier that prevents the irrigation pipes from clogging over time.
Note: You can also add mulch around each plant to help retain moisture during long periods of drought.
Finally, place each plant into its designated spot within your raised garden bed carefully and water it thoroughly until established. I filled the irrigation system with enough water until it began flowing through the overflow hose.
With proper care and maintenance, your self-watering raised garden bed will provide you with homegrown vegetables all season long.
You can also plant these medicinal plants next to your veggies, for a natural alternative to every drug in your medicine cabinet. Plus, in those unforeseen moments when medical care isn’t readily available, these plants will be a valuable resource.
In a grid-down scenario, it’s essential to have contingency plans and alternative water sources to grow your favorite veggies and fruits. A self-watering garden is a convenient solution that solves all garden watering problems and saves you time and planting costs.
You should also consider having rainwater collection systems, water filtration methods, or water storage containers to ensure a sustainable water supply for your self-watering garden bed and other survival needs.
Lastly, you should learn about drought-resistant plants, companion planting, and other water-conservation gardening techniques can further optimize your garden’s productivity in a resource-constrained environment.
You may also like:
What Is The Closest Amish Market To Your Home
DIY Priceless Household Items From “Junk” You Normally Throw Away (Video)
15 Reasons to Add 4lb Of Lard to Your SHTF Stockpile
