Best Camping Grills for Improved Outdoor Cooking


SHTFPreparedness may collect a share of sales or other compensation from the links on this page.
Everyone likes to enjoy a hot meal during a long weekend of camping, but we don’t like the inconsistencies of cooking with a pan over a campfire.
Instead, setting up the best camping grill gets your meal done quicker while still having that open air and view of nature to enjoy (and technically, it’s healthier than fire-roasted foods).
Apart from personal experiences, we’ve also done extensive research to ensure you’re getting the best possible options available.
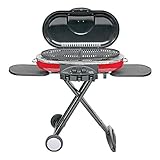
Clearly, the Coleman road trip isn’t going to be as inclusive to cook on as a full-size BBQ grill, but for its size and weight, it’s pretty darn close.
Finally, with the Coleman Road Trip Propane Grill, you can stop manhandling those weighty, bulky backyard beasts to the campsite and still show off as the grill dominator.
We like how it quickly folds up, easily rolls with only one hand, and sets up in a matter of seconds with the handy lift and lock system.
It’s simple to load up, tote around, and set up when you arrive at the campsite. When you’re ready to grill, simply press a button to activate the InstaStart matchless lighting system. Voila, you’re cooking!
This Coleman grill comes equipped with durable cast-iron grilling surfaces that work quite well and clean up effortlessly.
It’s perfect for large BBQs, picnics, tailgating, or weekend camping. When you’re ready to leave, it folds down small enough to fit in the back of most car trunks, which is handy.

This tabletop grill is quite the powerhouse little cook station.
It does require some seasoning before the first use. However, that is an easy process, and you can season it with a variety of flavored oils.
We enjoyed the fact that we could cook flapjacks, bacon, and eggs on it for breakfast, then burgers for lunch, and chicken and veggies for dinner.
All of the food came out perfectly cooked. Clean-up for this grill is super easy.
After each meal, once the grill has cooled, just take a paper towel, give it a good wipe down, and check the grease tray. Now, you are ready to cook up some more grub.
We also love that you can use it inside a camper or outside on a picnic table, which is convenient given the changing weather conditions.
The Lodge Sportsman is a rugged, well-constructed charcoal grill. This grill is perfect for low-maintenance, small-batch, hibachi-style camp cooking.
A draft door easily regulates the heat, and a flip-down door provides access to your charcoal or firewood.
The grill has two adjustable heights, which is helpful to avoid charring food, unless that’s what you’re going for.
It has a classic Lodge cast iron construction that is pre-seasoned with 100% natural products. You can use it straight out of the box, and the more you use your iron, the more seasoned it will become.
Lodge is a family-owned company that has been around since 1896. It is difficult to argue with a manufacturer who has been perfecting the process of making cast iron for more than 100 years.

Weber’s Smokey Joe grill is a timeless, take-it-anywhere, classic camping grill at the right price.
Simply designed and easy to fire up, this little fella is perfect for a weekend of good eating while camping.
The Smokey Joe 14-inch is compact and lightweight with a porcelain-enameled lid and bowl to retain heat, and it won’t rust or peel.
Dampers allow cooks to easily control the temperature, and a durable plated steel cooking grate retains all of the heat for grilling. Plus, it is easy to clean.
The Smokey Joe comes in two sizes, so if you need slightly more cooking surface, then check out their Weber Jumbo Joe 18”, which has the same great construction and reliability with a bit more cooking surface.
Every griller is familiar with the Weber brand and its classic charcoal kettle design.
Combine that with the company’s reputation and the fact that they offer a warranty, and you will agree that this is a solid charcoal grill for the money.
While grilling everything from pork chops to bratwurst to a variety of fowl, we experienced no issues.
This classic Weber grill, recommended by both amateur grillers and experts, outperforms cheaper charcoal grills and competitively competes with more expensive models.
The Texsport Heavy-Duty Camp Grill is a fantastic little grill. Compact and sturdy, it is great for all kinds of campers, from first-timers to seasoned vets.
It’s nothing fancy, but this grill is compact, easily transported, and built for rugged camp cooking in all types of weather conditions.
Its heavy-duty steel mesh grill can withstand heat and is robust enough to support heavy cast iron cookware.
We really like the simple design, especially how the legs fold in easily for storage. On the grill, Texsport lives up to its name and reputation.
It is no surprise; the company has been creating top-notch camping and outdoor recreational equipment for the past 40 years.
Rest assured, your simply designed Texsport camp grill will be appreciated on whatever venture you next find yourself on.

There is an overabundance of camping grills on the market today. It can be difficult to become knowledgeable about all of the different devices and features available on new models.
So, which is the best camping grill for you, and how do you know you are getting the performance you need at the best value?
The main factors for determining the proper camp grill are the same as those for a household cooking appliance:
With any piece of camping equipment, the cost is going to be a deciding factor for the majority of us.
The price range found among camping grills is extensive. Clearly, there are a wide variety of features, build quality, and brand recognition that determine cost. Here are the main cost considerations for the more expensive grills:
Name Brand: As with any product, brand awareness and reputation play a big role in its perceived value. Along with the brand’s name comes an expectation of better quality, reliability, and often a warranty.
Is it easier to start with a push-button or build up hot embers? This is an important factor, depending on your experience and the skills of others helping you. When building a fire, what fuel is best for you really depends on how comfortable you are.
Extra Amenities: Many budget-friendly camp grills don’t have any added amenities, though some do. You’ll need to bump up your budget a little if you want extra amenities with your new grill.
Larger camping grills with greater cooking surface area and enhanced features tend to be pricier, but they may be worth the extra cost, especially if you frequently cook for more than just a couple of people.
When deciding, consider these aspects:
How much heat do you need? Are you familiar with BTUs? With gas or propane grills, you’ll see BTUs (or “BTU” or “BTU/hour”) listed.
A gas camping grill will work at a higher temperature, which allows it to heat up faster and sear better, but if maxed out, it will also use more gas.
On the other hand, achieving the right temperature for a charcoal fire requires some skill. Charcoal is less expensive, cooks food slowly, and adds a variety of flavors.
If you plan to grill mainly veggies, burgers, or hot dogs, you don’t need a high BTU, so a charcoal grill could be a useful option.
If you plan to use your grill regularly and want to sear steak easily or cook a wider variety of foods, you may want a grill with higher BTUs.
Additionally, think about cleaning up; you need to properly disperse charcoal embers, but you can simply turn off a gas grill.
Pro Tip: Be sure and calculate the total BTUs. BTUs may be listed per burner. A 2-burner grill with 10,000 BTU per burner (20,000 BTU total) will produce more heat than a 3-burner with 5,000 BTU per burner (15,000 BTU total).
Gas and charcoal grills cook very differently due to their control over heat distribution.
If you don’t distribute heat evenly across the grill, your food will cook unevenly or at different times depending on the location. Every camping grill is different.
With trial and error, you can acquire the skill to cook on your grill and adjust the temperature accordingly, but a more even distribution of heat will make grilling less stressful from the start.
Can you easily get rid of the ashes or grease? Most charcoal camp grills have ash collectors; gas grills have grease traps.
Are the grains easy to remove in order to make ashes? Can you get to the burners and clean them? Is the grease tray simple to remove?
Size does matter. When it comes down to it, the size of a camp grill answers a lot of questions.
What foods can be cooked, in what quantity, how much fuel is needed, how portable is it, and most importantly, can you cook an enormous steak on it with all the fixings?
Another thing to consider is how and/or where you plan to use your grill. Will it live in your camper, or do you plan to move it to a picnic table or cooking area when camping?
If you plan to camp in windy locations or if you decide to carry it further away from camp to set up, weight can be a factor. A heavy grill is safer in the wind, but it is a detriment if portability is a priority.
Pro Tip: Before you go shopping for a new camp grill, measure the area you plan to use as your cooking space (i.e., countertop, picnic table). This will help you determine the grill dimensions you can safely operate in the desired space.
Cooking surface area can be another important deciding factor when shopping for a new camp grill.
The cooking surface area is measured in square inches. There are two methods to accurately measure the square inches of the main cooking grate.
If the cooking surface is square or rectangular, the formula is easy:
Area = width x depth
If the cooking surface is round, the formula is: area = pi times the radius squared.
To determine a round object’s radius, measure from edge to edge across the widest part of the circle.
This number represents the diameter. The circle’s radius is the diameter divided by 2. To square the radius, simply multiply the value by itself (for example, 5×5=25 or 4×4=16).
When deciding how much surface you need, remember that you do not want to pack food too close together; you should leave at least 1/2″ between food items while cooking.
Not much surface area is required if you and one other person are heating up some hot dogs.
However, if you will be grilling for five or more people regularly, you may want to go for a larger camp grill. If you only grill for large groups occasionally, you could cook in batches on a smaller grill, although time-consuming.
How many seasons will your camp grill last is a serious factor to consider.
Is the grill well-built? Does it contain numerous small parts that are prone to breaking easily? Will you be grilling in wet conditions?
Rain, snow, or ocean mist can cause damage to your new grill. Common water-related issues include corrosion of the outer material, rusting of the grates, and ruining the starter on gas models.
If you don’t want to replace your camping grill every couple of years, consider a well-built grill that has features to protect it from the weather.
Other key factors in selecting your new camping grill will include the number of people eating, ease of use by others, type of foods being prepared, portability, extra features, and the aspiration to cook mouthwatering foods your friends and family won’t soon forget.
For those who prefer a charcoal grill over a propane grill, it’s good to know how to properly build a charcoal fire so that you have consistent heat and hot coals that last long enough to cook whatever you have on the menu.
Here are some tips to help you build a wonderful charcoal fire.
Start by lighting the charcoal at the bottom of the pile. Your fire should quickly work its way to the top. If you’ve chosen to light your fire with newspaper instead of charcoal, make sure to ignite the newspaper first.
The fire should easily spread to the top coals, but if it doesn’t, you can easily light the upper chips or briquettes as needed.
Use tongs or even a stick to distribute the coals throughout the pit. Ensure an evenly heated cooking surface and well-cooked food by spreading the heat around. Move slowly when doing this; hot embers can be dangerous and cause painful burns!
Cook your meal! When you’re done cooking, douse the fire. Make sure that you fully extinguish your hot coals.
By the time you’re done cooking and eating, your coals may have burned out, but to be safe, throw a little water over the coals. Hot embers can be deceiving, and they can easily flame back up.
We understand that selecting the best camping grill, suitable for a culinary master, can be a bit overwhelming.
To be honest, it’s a question that we’ve asked ourselves while preparing for our own camping trips.
Once you discover how easy cooking your favorite appetizers, veggies, and meats can be on your new camp grill, you’ll ponder how you ever prepared a camp dinner without it.
If you’ve read this article to this point, you are well on your way to finding the perfect grill, and we are confident that you will end up with an appliance that adds immense satisfaction to your camping experience.