How to Start Fires with a Magnifying Glass


Fire-starting skills are one of the most important assets in a prepper’s bag of tricks. Fire can be an essential resource in all kinds of survival situations, enabling you to stay warm, see at night, cook food, and sterilize water.
Obviously, keeping matches, lighters, and other tools on hand and as part of your kit is a good idea, but take it from me: there is no such thing as having too many ways to start a fire when required…
One of my favorite methods is through the use of a magnifying glass or some other magnifying lens.
By focusing the sun’s rays on a tiny spot, you can easily ignite tinder and then get a fire going. No fuss, no muss, and no elbow grease required! It’s a lot easier to do than you might think.
Keep reading, and I’ll give you a step-by-step guide to everything you need to know below.
You need next to nothing for this fire-starting method as long as you’ve got some kind of lens and suitable tinder, kindling, and fuel. And sunshine, of course!
Magnifying Lens: nearly any magnifying lens will work for this technique. I prefer to use an actual magnifying glass or a handheld magnifying lens, but you can even use the lens out of prescription eyewear, binoculars, a rifle scope, or anything else in a pinch.
I strongly recommend you add a small magnifying lens to your survival kit or bug-out bag for best results, though.
Tinder: as with starting any other campfire, you don’t want to try and light your kindling or your primary fuel directly. That’s going to make things a whole lot harder than they have to be.
You can use naturally sourced tinder like pine needles, dry leaves, cattail fluff, bark, and the like, or man-made stuff like bicycle inner tubes, dryer lint, char cloth, and more. The trick is to remember that drier is better!
Kindling: kindling is the smaller fuel that you’ll ignite with the burning tinder to then get your primary fuel going. You want to have this close at hand and set up ready for ignition.
Primary Fuel: to keep a sustainable fire going, you’ll need larger pieces of fuel, usually wood, but this could be cardboard, fireplace logs, or whatever else you’re trying to burn depending on the circumstances.
Tongs or Some Other Utensil: not strictly required depending on the type of tinder you are using, but you don’t want to get burned when you’re trying to move or position it once it catches fire.
You can use tongs, long-handled tweezers, or a convenient stick as long as you can control the tinder with it.
I know, obligatory safety brief again. But there’s a good reason for it. This is no parlor trick that we are going to be doing.
Using a magnifying glass to focus the sun’s rays can turn it into a literal death ray. It can and will burn you if you focus it on your skin or clothing.
But the very worst thing you can do is hold up a lens between you and the sun and then look into it: that will fry your retinas, cones, and rods! Never, ever do that!
Treat this seriously, and pay attention…
Put away your magnifying glass when you’re done using it to prevent possible accidental fires—it’s happened before because people have left them lying around carelessly on sunny days!
The following instructions are straightforward, but you are best served by reading over them ahead of time so you know what to expect.
Step 1: Clear area for fire, set up windbreak. The very first thing you need to do is clear the area where you plan on building your fire. Use basic fire safety and precautions.
Pull back all other flammable materials that you don’t want to catch fire, leave yourself an easy exit in case the fire gets out of control, and have sand, dirt, or water set nearby to extinguish it if required.
Also, if you’re dealing with anything more than a gentle breeze, set up a windbreak so you can protect your tinder while it heats up.
A strong wind could blow your tinder around, or it will lower the temperature quickly enough that you’ll struggle to ignite it in the first place. Once everything is set up, move on.
Step 2: Assemble tinder. Prepare your tinder. Make sure it is absolutely dry, and if needed, fluff it up or separate it depending on what type it is.
The rule of thumb is that it should be very loose, frizzy, fuzzy, and ready to catch even the slightest spark. If you’re using straw, dried grass, leaves, pine needles, lint, paper, char cloth, and things like that, form it into a donut or bird’s nest shape.
For solid tinder types like corn chips, rubber strips, commercially sold fire starters, and the like, prepare a small piece or a pile of several small pieces on a flat plank of wood or bark that you can pick up and deposit directly into the kindling.
Step 3: Prepare kindling. Build the preliminary stage of your campfire using the kindling. You can build a square style, tipi style, Swedish torch, or any other type that you prefer. Just have it ready to go in the area you cleared and the tinder set nearby.
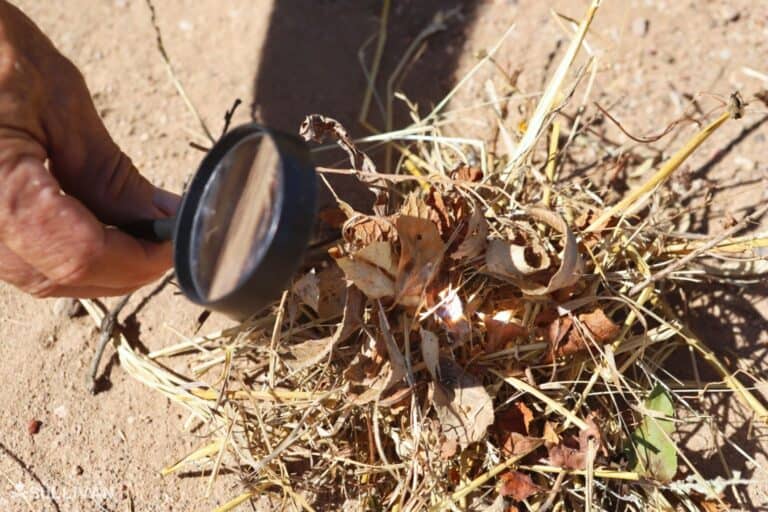
Step 4: Hold lens perpendicular to sun’s rays. Grab your lens and position yourself, and it, between your tinder and the sun. Make sure your body is not blocking the sunlight; you don’t want your tinder to be in the shade. Then hold up the lens perpendicular to the sun’s rays so that it focuses a beam or spot on your tinder.

Step 5: Move lens toward and away from tinder to focus. Now we adjust the intensity of the beam by moving our lens closer to and farther away from the spot.
Watch the sunspot grow and shrink as you move and adjust. Make your “coarse” adjustments right now, getting into a comfortable, stable position and getting the bright spot of sunlight directly onto the tinder pile.
Step 6: Try to get “spot” about ¼” in size. Now make fine adjustments; slowly dial in the positioning of your lens until the sunspot is about a quarter inch in size, no larger. This will produce intense heat on a very small area and will quickly ignite your tinder. Still, it will usually take a couple of minutes, even in ideal conditions.
Step 7: Hold sunspot still on tinder. This is the hard part. Hold completely still, keeping the sunspot on the same part of your tinder the entire time. As mentioned, this will usually take a couple of minutes.
Make sure to protect the tinder from wind, and don’t move so that you accidentally shade the tinder, which will drop the temperature.
Step 8: Watch for smoke, adjust lens position if needed. Like every other fire-starting technique, when you see or smell smoke, you are getting close. Keep going and keep it focused!
As the sun starts to track across the sky or if obstacles get in your way, don’t hesitate to quickly reposition and re-establish your hold.
Step 9: Blow very gently on tinder to help ignition. Once the tinder is smoking furiously, get close to it and ever so gently blow on it, just like you would if you were trying to start a fire with friction.
This will supply a burst of oxygen that will help the tinder catch fire. Take care that you don’t blow too hard and put out the coal.
Step 10: Once tinder catches fire, quickly and gently move bundle to kindling. As soon as the tinder properly catches fire, quickly, carefully, and gently move it to the kindling so it will catch. If it should go out, put it down and focus your lens again to reignite it. It shouldn’t take much.
Step 11: Once kindling ignites, add primary fuel to build fire. It’s all downhill from here. Once the kindling has caught fire and is crackling, add a little bit of your primary fuel to start building your fire.
Step 12: Done! And that is it! You successfully started a fire using a magnifying glass and the power of the sun alone.
Any tinder beats no tinder, but you should break out the very best tinder that you’ve got for this purpose. Compared to starting it with the open flame of some kind, light, frizzy tinders work the best.
I’d choose something like dryer or pocket lint, a bundle of dried grass or bark shavings, jute, or a really dry twig that was whittled into a feather stick for the purpose over something like inner tube, solid fire starter cord, or a pine cone.
Back to basics here: anything you are using to start a fire should be absolutely dry. But it’s even more important here since you aren’t using a match, lighter, or anything else that can produce an open flame.
It’s a lot easier than using friction for the same purpose, but moisture can still ruin your efforts. If your optimal tinder is even slightly moist, go with a less ideal option that is completely dry.
One trick I’ve learned over the years with this technique is that you have a much easier time of things if you brace your hands and wrists once you’ve got the lens focused in the perfect position.
Sure, a magnifying glass might weigh very little, but hunching over and trying to hold it perfectly still for several minutes can be trickier than you think, and it’s easy to start trembling. Use your pack, a log, a few stones, or whatever is necessary to give yourself support.
It’s possible to use this technique on cloudy days, but as mentioned, you’ve got to have sunlight and preferably direct sunlight.
An intermittent cloud or two, or thin cloud cover, will result in the process taking a lot longer, but a seriously overcast day or one with lots of smoke or haze in the air might ruin your chances.
If you’ve had to hold the lens on target for more than 10 minutes, it’s probably not going to work. Try something else and save time and aggravation.

Tom Marlowe practically grew up with a gun in his hand, and has held all kinds of jobs in the gun industry: range safety, sales, instruction and consulting, Tom has the experience to help civilian shooters figure out what will work best for them.