How To Stop The Bleeding Using A Tourniquet


The danger of hemorrhage from traumatic injuries is ever-present, whether in times of peace or chaos, arising from incidents like car crashes, workplace accidents, civil disturbances, or even a hypothetical zombie apocalypse. Without prompt treatment, a severe arterial bleed can render a person beyond medical assistance within mere minutes. Sometimes, the blood loss is so critical that emergency responders can’t reach the victim in time.
Uncontrolled bleeding is the primary cause of death in 90% of potentially survivable battlefield injuries, with most fatalities occurring before the injured can access advanced medical care. Therefore, it is crucial for medics in survival situations to understand how to manage bleeding wounds and have the appropriate tools to control them.
Among these tools, the most crucial is the tourniquet. This device applies pressure to a vein or artery, effectively halting blood flow and preventing further blood loss.
Efforts to control battlefield bleeding date back to ancient times, including the era of Alexander the Great. Early methods typically involved using a cloth or strap and a stick to twist and apply pressure to a bleeding limb.
In the early 1700s, French surgeon Jean Louis Petit invented a more sophisticated device: a strap with a screw that could be turned to compress blood vessels and stop bleeding. The term “tourniquet” originates from the French verb “tourner,” meaning to turn. During the American Civil War, over 50,000 strap tourniquets and 13,000 Petit screw tourniquets were utilized to perform more than 29,000 amputations on Union soldiers.
Since then, tourniquets have been both heralded as lifesaving devices and criticized for causing limb loss. In the 21st century, the perception has shifted towards the former. A 2013 study of military experiences in Iraq and Afghanistan revealed that nearly 25% of combat deaths from hemorrhage between 2001 and 2011 could have been prevented with proper equipment and training.
Today, every U.S. soldier carries a tourniquet as part of their individual first-aid kit when deployed in the field.
Although the volume of blood in the human body varies based on factors such as sex, weight, age, and even altitude, an average estimate is about 9 to 10 pints. How does blood loss manifest in the signs and symptoms observed by a rescuer?
The American College of Surgeons categorizes hemorrhage into four classes with distinct signs and symptoms:
Class I: Loss of up to 1.5 pints (0.75 liters)
Class II: Loss of 1.5 to 3 pints (0.75 to 1.5 liters)
Class III: Loss of 3 to 4 pints (1.5 to 2 liters)
Class IV: Loss of more than 4 pints (over 2 liters)
The Combat Application Tourniquet (CAT) is one of the most widely used commercial tourniquets by both military and civilian personnel. Here are the steps for its proper placement:

Understanding hemorrhage and the proper use of tourniquets is essential for an effective off-grid medic. Several key principles must be considered:
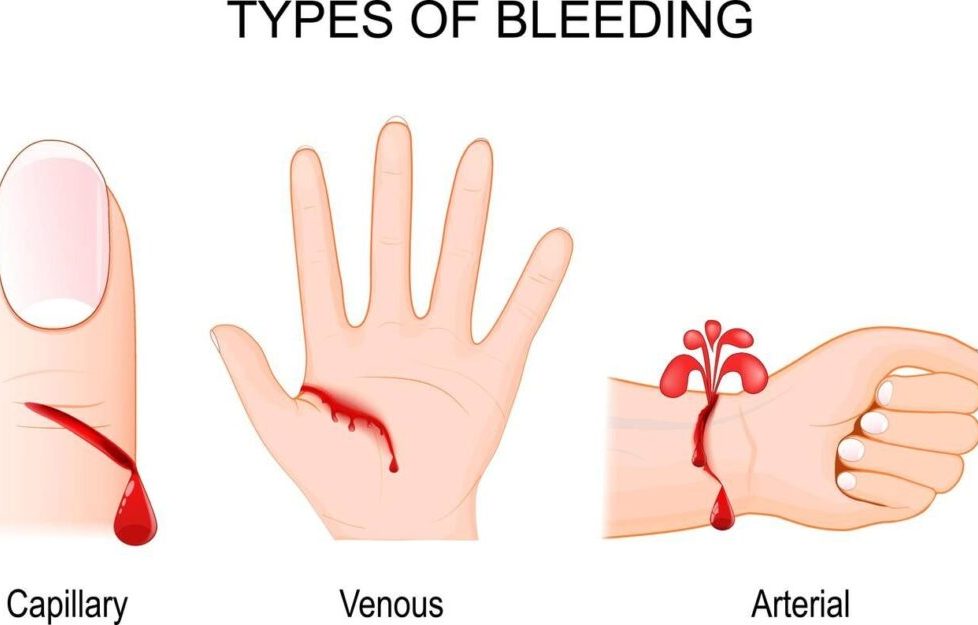
Understanding the difference between arterial and venous bleeding is crucial. Arterial blood is oxygen-rich, giving it a bright red color, and it tends to spurt vigorously from the wound in sync with the pulse. This type of bleeding is under higher pressure, making it more challenging to stop. In contrast, venous blood is oxygen-poor and much darker. It flows more steadily due to lower pressure, making it easier to control compared to arterial bleeding.
Using your hands to apply direct pressure on the extremity can stop 80 to 90 percent of bleeding. However, in situations where the injury is clearly life-threatening, applying a tourniquet immediately is usually the best course of action. The chances of survival are significantly higher when a tourniquet is used before the victim goes into shock from blood loss.
Applying pressure is still very effective. When you first encounter a victim, try to put on gloves if you have them, and use a cloth, dressing, or another barrier to apply pressure to the wound. This method can often stop mild to moderate bleeding. If the bleeding stops, keep applying pressure for at least 10 minutes and call for help.
Ensuring your hands are free is essential to access supplies like gloves, dressings, and tourniquets. If needed, you can use your knee to apply pressure temporarily while reaching for a tourniquet, bandages, or other necessary items.
It’s important to note that standard limb tourniquets are not suitable for controlling bleeding in the groin/hip, torso, or armpit/shoulder areas. Specialized devices called junctional tourniquets are required for these types of bleeds.
Successful tourniquet application on extremities relies on understanding the complete extent of the bleeding injury. Using shears to fully expose the limb facilitates a rapid and thorough examination of the hemorrhage source and extent. Position the casualty in a manner that offers optimal visualization, often the “shock” position: lying supine with the legs elevated approximately 12 inches above the heart.
While it’s ideal to place tourniquets on bare skin, in hostile situations, medics may not have the luxury of time to remove clothing and thoroughly assess the bleeding site. In such scenarios, it’s acceptable to position the tourniquet high on the extremity and over the clothing. If there are foreign objects or projectiles embedded in the wound, they should be left in place as they may help control bleeding. Pressure can be applied by packing material around the object on both sides.
Raising a bleeding limb above the heart level might hinder the heart’s ability to pump blood out of the body, but it’s unlikely to completely halt bleeding without direct pressure. Attempting to compress “pressure points” is seldom effective in stopping heavy bleeding for two reasons: firstly, locating the precise spot can be challenging, and secondly, limbs receive blood supply from multiple arteries.
Position the tourniquet approximately 2 to 3 inches above the hemorrhagic wound. Why not directly on the bleed? When an artery is severed, it typically retracts towards the torso, making direct application less effective. However, avoid placing the tourniquet directly over a joint, as this may cause significant nerve damage, particularly in joints like the knee, ankle, or elbow. Instead, apply it higher up to ensure effectiveness and minimize risks.
Applying tourniquet pressure against one bone is more effective than against two. In areas like the forearm and lower leg, bleeding may occur between two bones, such as the radius and ulna or the tibia and fibula. Applying pressure against the humerus in the upper arm or the femur in the upper leg is more effective in controlling hemorrhage in such cases.
Typically, deep bleeds necessitate packing the open wound to access bleeding vessels. If bleeding persists, keep standard dressings in place and add new ones on top. If the wound continues to bleed through subsequent bandaging, consider using hemostatic-type dressings like QuikClot or Celox. For these products to work effectively, they must directly contact the bleeding vessel. In such cases, remove old dressings before applying the hemostatic dressing and apply firm pressure to the area for at least three minutes.

Be cautious of “pressure loss,” which describes the decrease in tension under the tourniquet that often happens after the initial minute or two of application. This loosening could lead to rebleeding, so it’s important to monitor the tourniquet’s tightness and readjust if necessary.
The initial tourniquet might not completely halt the bleeding; in such cases, a second one may be required and should be included in every medical kit. Position the second tourniquet directly above the first one, closer to the heart, to enhance effectiveness.
When tightening the tourniquet and twisting the windlass, ensure to apply firm pressure. If the victim doesn’t feel discomfort during this process, it indicates insufficient pressure. It’s advisable to forewarn them that it will be painful. A properly tightened tourniquet should stop both bleeding and any pulse beyond it (farther from the heart). However, traumatic amputations may present exceptions, as some oozing from the bone marrow of the stump may occur despite correct tourniquet placement.
It’s essential to document the time of tourniquet application in a clearly visible location, ideally with a permanent marker. The Combat Application Tourniquet (CAT) often provides a space on the windlass strap for this purpose. Fortunately, leaving the tourniquet in place for up to two hours, or even longer according to some studies, typically carries minimal risk of permanent damage or amputation. In remote or austere environments, you can mark a “T” and the time on the patient’s forehead using ashes or blood for visibility.
Improvised tourniquets, such as those made from a bandanna and a stick, may assist in controlling hemorrhage, but they are generally less effective than commercially manufactured military-tested items. For instance, using a man’s tie may create a cord-like effect that is too thin and can damage tissues. It’s recommended that a tourniquet be at least 4 centimeters wide to avoid nerve damage underneath it. Classic leather-belt tourniquets, often depicted in movies, are typically challenging to tighten with a stick and may not secure in place easily.
When transporting a victim with a tourniquet in place, it’s crucial to continuously monitor for rebleeding. Blankets should cover the victim to prevent shock, but special attention is needed for a tourniquet, especially if it’s improvised, as it could become dislodged due to the jostling during evacuation. It’s important to frequently expose the wound area to check for bleeding. Additionally, splinting the extremity will aid in stabilizing it, reducing the risk of further hemorrhage.
It’s essential to refrain from loosening or removing the tourniquet until the patient is in a controlled environment. Repeated loosening and tightening can potentially exacerbate blood loss and worsen the victim’s condition.
For safety precautions, it’s advisable to transition the tourniquet to hemostatic gauze and a pressure dressing before reaching the two-hour mark. Once the hemostatic gauze is firmly packed inside and the pressure dressing is applied over the wound, slightly loosen the tourniquet (but do not remove it) to assess for any recurrence of bleeding. If bleeding resumes, retighten the tourniquet; if not, loosen it further. Continue to monitor the situation closely, reassessing once all tension has been released from the tourniquet, and maintain constant vigilance.
 Medical kits should be as easily accessible in public areas as fire extinguishers, and they should consistently contain a tourniquet. It’s crucial for everyone to be trained in its proper usage. Personally, I believe this training should be integrated into standard school curricula.
The U.S. government has introduced the national Stop the Bleed initiative, aimed at providing training to the general public. This initiative has empowered thousands of Americans to effectively address significant hemorrhages, ultimately saving lives. You can join this effort and become one of those capable individuals.
You may also want to check this:
Knowledge to survive any medical crisis situation during a major disaster
Trauma Scenarios And How To Handle Them
Find Out What’s the Closest Nuclear Bunker to Your Home
Medical Procedure – IV Basics For The Prepper Medic